Shutter speed refers to the 'shutter', which is a thing that blocks light from reaching the sensor until you're ready. (Well, technically in digital compact cameras, there's a digital equivalent, namely the sensor turns itself on and off instead of having a physical thing blocking it. But it's the same principle.)
When you take a picture, the shutter will go up, letting the light through, and then when it's done exposing the light, it'll go back down again. If you have the shutter speed set to a long time, that means it's open for longer and more light can get in.
Incidentally, this means that if it's set for a long time, and you move the camera, you'll get what's known as camera shake: the image will get blurred because light will be coming from different places. It also allows you to hold the camera still but blur movement, creating cool effects.
Imagine what would happen if there was a fairly dark (though not pitch-black) scene, such that you had to keep the shutter open for, say, 15 seconds. Now what would happen if you quickly came on the scene, waved a small light around like a torch or an LED, and jumped out again? This is called light painting. There are a bunch of fun tricks like this you can do with long shutter speeds.
Aperture means how big the hole is in the lens that lets light through. When it's very small, not much light gets through, but when it's very big, lots of light can get through.
Aperture also affects the depth of field: how much is in focus. For example, if you wanted to make a blurry background for your portrait, you would open the aperture up as much as possible. Or, if you wanted everything to be in focus, you'd close it down and make it as small as possible. Example.
(If you wear glasses, you can test this by poking a pinhole in a bit of paper and looking through it without your glasses. Stuff that was out of focus becomes sharp. This is exactly the same as a small aperture.)
If you want to make sure your picture is properly exposed (as in, make sure it has enough light and doesn't look dark), you have to either open the aperture wider or have the shutter stay open for longer. But there is a third thing you change do in low-light conditions: ISO.
ISO (occasionally called 'ASA') refers to how sensitive the sensor is — how much light has to hit its pixels until it 'counts'.
Changing the ISO is nice because it doesn't change the image much except to make it lighter or darker. The problem with raising the ISO is that higher ISO settings can make the image come out very grainy. (Example. Varies by camera. D-SLRs can usually do up to 1600 without much quality loss.)
Now, there's one more special thing that ties these three together:
Aperture, shutter speed, and ISO all change something called stops. Essentially, the way light is measured is that whenever you go 1 stop down, that means you're halving the amount of light, and when you go 1 stop up, you're doubling it.
Even though the notation for the measurements and what they refer to is different — aperture is measured in f-stops "f/number", shutter is measured in time "number of seconds" or when it's "1/30" that means "one 30th of a second", and ISO is numbers like 100, 200, etc. — they are all equivalent in some sense.
The sense is: if you put one up by 1 stop, and another down by 1 stop, you have exactly the same amount of light. So the picture won't get darker or brighter. The exposure (exposure means the total of all this light exposed to the sensor) remains the same.
For example, a picture taken at ISO 100, at 1/30, with f/11, looks the same light-wise as the same picture taken at ISO 200, 1/60, f/11. Because you're stopping up ISO (doubling it to 200) and stopping down shutter speed (halving from 1/30 to 1/60).
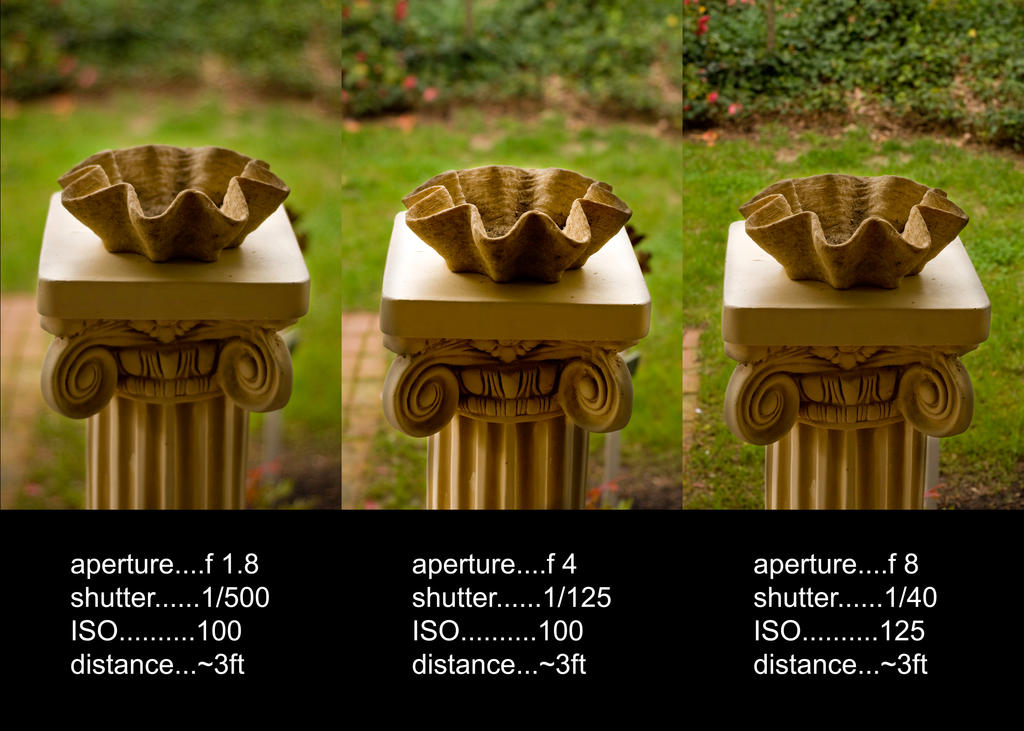
Here's an example of doing this to get a different depth of field. It's the same picture, same amount of light, but because they balanced the aperture and shutter speed in different ways, it gave quite dramatically different looks.
Lots of good photographers work in Aperture Priority mode (you pick the aperture, the camera does the rest): so long as the shutter is 'fast enough', it doesn't make much difference in terms of effect. With aperture, you can tell straight away whether it's wide or not from the blur.
Going into full manual mode is very useful for any tricky light situations.
If there's low light and you want to hand-hold the camera, but you don't want camera shake, you're going to have to control the shutter. If you want to make sure you get your subject in focus (especially if it's moving around), you might make the depth of field bigger by closing down the aperture. You may want to make sure the camera never produces grainy images, so you'll want to control the ISO, too. I ran into all of these at once when I tried to take photos of a very active performance at a pub. It was tricky to say the least.
No comments:
Post a Comment