High Key photography is characterised by very light, low-contrast images. Lots of white, soft lighting, getting rid of shadows wherever possible. (Contrast this with Low Key, which is characterised by very dark, high-contrast images. Lots of black, limited light, often hard shadows.)
After searching around for some good tutorials on high-key, I found that most of them suck, and give advice that might actually be harmful. High-contrast and blown-out highlights everywhere!
The most important thing to keep in mind when doing high-key photos is to not blow out your highlights. Do not over-expose your image when you're taking it — you can lighten it with software afterwards.
Blowing out highlights means that the light parts have gone past the point where the camera can detect different shades of white, so it just registers it all as 'maximum white'. This kills any detail in that area (and can look really bad when looking at it from certain angles on your monitor). So, sure, expose as much as possible, but make sure you stop just before the highlights die. Think 'off-white'.
The second thing is that not every photo was destined to be high key.
In fact, unless you keep some principles in mind while taking the photo, it'll be pretty hard to turn it into high key after the fact. Here are some tips to keep in mind:
- Shoot in RAW, if your camera lets you. RAW allows you to mess with the photo on your computer much more before it harms the picture.
- Get lots of light. Wikipedia says "three [lighting] fixtures per person (left, right, and central)". You want to minimise those shadows.
- Shoot against a white backdrop (a white wall is perfect, but a sheet may also do). Just to make sure it's as white as white can be, put a light facing it.
- Shoot subjects that are already light. It might be hard to get the high-key effect on Rottweiler, compared to a yellow Labrador.
- And above all: don't blow out your highlights! You still need information in that RAW to mess with it in image-editing software later.
Here's my first attempt, after working all this out yesterday:
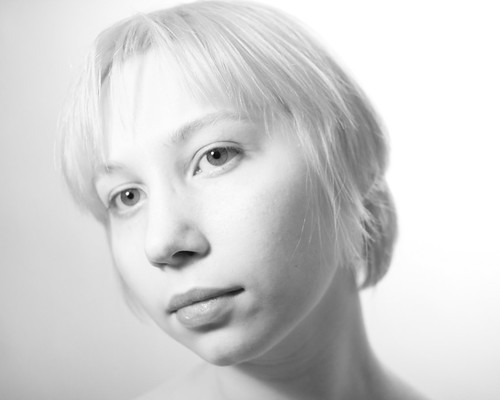
Here's all I did to the original colour image to get it like this (I used the software Lightroom):
- Converted to black and white.
- Turned up orange grey level. (This selectively lightens only orange tones. This is great for making skin lighter.)
- Made shadow tones a bit darker.
- Lightened the left side a little (it was darker because I didn't position the lights evenly).
- Cropped.
It's not perfect: the shot is a little boring, and there is slight highlight blowout (e.g. around the forehead). Also, if you look at the larger version on Flickr, you'll see the focus isn't perfect on the eye. But it's a start.
My shot you linked to is actually just lit by a single fairly harsh light. As long as you have detail in the shadows you can make them bright, as well.
ReplyDelete